8 FUN ACTIVITIES
Temperatures are dropping which means kids are spending a lot more time indoors. Snow days are great fun, but you can’t spend the entire day outside in the snow. To help keep screen time to a minimum, here’s a fun list of indoor Winter Activities for kids to help break up the indoor boredom and keep little hands creative?
1 – Snow Day Sparkle Slime
• Borax
• Elmer’s clear glue
• glitter
• water
• liquid or gel food coloring
Once you have everything, you can get started, mix away!
2 – Foam Cup Snowmen
• Foam cups
• Felt
• Medium pom poms
• Pipe cleaners
• White craft glue
• Scissors
• Black marker
Cut a 1-inch wide strip of felt using the full length of the felt sheet. Fringe the ends with scissors by cutting 4 or 5 slits at each end.
Place your foam cup upside down. Glue the scarf around the cup, leaving enough room for a face.
Cut triangles from orange felt and glue them to the face area.
For the earmuffs, cut a pipe cleaner in half. Bend it around the top of the snowman and trim the ends so that they hang over by about 1/2-inch.
Trim one side of a pom pom to make it a little flatter.
Glue to the pipe cleaner on the side of the snowman’s head. Repeat for the other side.
Use a black marker to add eyes. You can add eyebrows if you like as well! I always do because it adds to their cute expressions and gives them character.
3 – Make Play Snow
3 cups of baking soda mixed with a half a cup of conditioner.
It molds easily, feels cool to the touch and smells like freshly washed hair. Plus, the clean up was a breeze.
4 – Frozen Erupting Snow
• 500g bag of bicarbonate soda
• 1 can of shaving cream/foam
• blue glitter
• vinegar
1. Pour your bicarbonate soda into a large mixing bowl
2. Add the can of shaving cream (we found we only needed about 3/4 of a can to get the thick ‘snow like’ consistency that we were after).
3. Add as much glitter as you like! Now give your mixture a good stir.
Due to the shaving cream, the ‘snow’ even feels cold! Now to get the ‘erupting’ part of this activity happening, you just need to pour the vinegar over your snow and watch the magic happen…
5 – Cinnamon Sugar Snowflakes
• 1 pkg of small white tortillas (8 per package)
• 3 tbsp of butter, melted
• 1 cup of white sugar
• 2 tbsp cinnamon
1. Take 1 tortilla and warm it in the microwave for 5–10 seconds so it will fold easily. Fold the round tortilla in half and then fold it in half again.
2. Using a clean pair of scissors, cut your tortilla like you would a paper snowflake.
3. Take your melted butter and a silicone brush, and brush 1 side of the tortilla with melted butter until lightly and evenly covered.
4. Mix your sugar and cinnamon together in a dish. Sprinkle your tortilla with a light even layer of cinnamon sugar.
5. Preheat oven to 350°F. Place your snowflake tortillas on a baking pan. Bake in oven for 10 minutes or until nice and crispy. Remove from oven and let cool. Enjoy.
 6 – Mini Winter Terrariums
• Assortment of glass jars, lids optional
• Salt
• Pebbles
• Moss
• Mini Animal Figures
• Cardboard
• Hot glue
• Spray paint and primer
optional if you want to paint the lids
1. Select your jar, figure, and accoutrements.
2. Depending on the height of the jar you may either hot glue everything to the bottom of the glass jar or glue everything to a piece of cardboard to build up some height. I used some cardboard packing shapes as the bases, then glued that to the bottom of the jar
3. Add your salt. Be careful not to pour it over anything it will get stuck in, like the moss. Depending on how snowy you want it to look you can adjust the salt height by slowly adding more or pouring a little out.
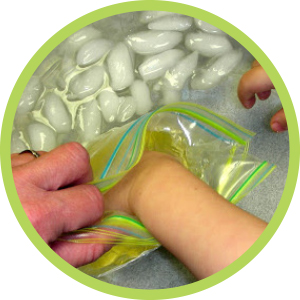 7 – Blubber Experiment
Show your kids how blubber keeps the animals from feeling the cold air and water.
Fill a container with ice water and got some vegetable oil. Then I filled two small ziploc bags with the oil and sealed them. I put those bags inside another small bag and the kids could put their hand inside between the two bags of oil, almost like a glove.
Then they put both hands, one in the oil and one by itself, into the bowl of ice water. They agreed that their bare hand was freezing and their hand in the oil was warm! It was a perfect way to show them — blubber keeps animals warm!
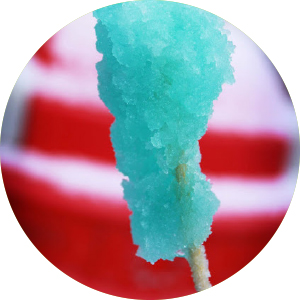 8 – Rock Candy Science Experiment
• 2 c water
• 4 c sugar
• 1 tsp flavoring extract or oil
• Food coloring
• Glass jar
• Skewers or lollipop sticks
1. Wash glass jar with hot water to clean it.
2. Wet your wooden skewer and roll it in granulated sugar. This base layer will give the sugar crystals something to “grab” when they start forming. Attach the skewers with tape to a pencil to lay across the top of the jar. Set the skewers attached to the pencil aside to let dry while you prepare your sugar syrup.
3. Place the water in a medium sized pan and bring to a boil. Begin adding the sugar, one cup at a time, stirring after each addition. Continue to stir and boil the syrup till all the sugar has been added and it is all dissolved. (this will take around 10 – 15 min) Remove pan from the heat. Add the color drops and flavorings.
4. Allow the sugar syrup to cool for approximately 10 min, then pour into the prepared jar. Lower the sugar skewer until it hangs about 1″ from the bottom, not too close to each other or the sides of the jar.
5. Carefully place your jar in a cool place, away from harsh lights, where it can sit undisturbed. Cover the top loosely with plastic wrap or a paper towel.
You should see sugar crystals start forming within 4 hours. If nothing happens you may have to try boiling the syrup again and dissolve another cut of sugar into it, then pour it back into the jar with the skewers.